To vent a range hood on an interior wall, install a duct through the wall to the exterior. Use a wall cap to prevent backdrafts and ensure proper airflow.
Venting a range hood on an interior wall can seem daunting, but it’s a manageable task with the right approach. Proper ventilation removes smoke, odors, and heat, creating a more comfortable cooking environment. An interior wall venting system requires careful planning to ensure efficiency and compliance with local codes.
Homeowners can enhance kitchen air quality while preventing moisture buildup and grease accumulation. This process involves selecting the right materials and tools, as well as understanding the layout of your kitchen. A well-vented hood not only improves air circulation but also prolongs the life of your appliances and enhances your cooking experience.

Credit: www.reddit.com
Introduction To Range Hoods
Range hoods are essential for maintaining a healthy kitchen environment. They remove smoke, grease, and odors effectively. Proper ventilation is crucial for reducing air pollutants. Good air quality helps everyone breathe easier.
Using a range hood on an interior wall presents unique challenges. Space is often limited, making installation tricky. Finding the right path for ductwork can be hard. Noise from the fan can be bothersome in smaller areas.
It’s important to choose a range hood that fits your kitchen’s design. An effective model should have a strong CFM rating to ensure proper airflow. Regular maintenance will keep it working well.
Types Of Range Hoods
Range hoods come in two main types: ducted and ductless. Each type has its own benefits.
Ducted range hoods vent air outside. They usually work better for removing smoke and odors. Installation can be more complex due to the need for ductwork.
Ductless range hoods filter air and recirculate it back into the kitchen. They are easier to install and often more affordable. However, they may not eliminate odors as effectively.
Styles and designs of range hoods vary widely. Choose from modern, traditional, or industrial looks. Materials can include stainless steel, wood, or copper.
Consider the size and shape of your kitchen. A well-chosen range hood enhances both function and style.
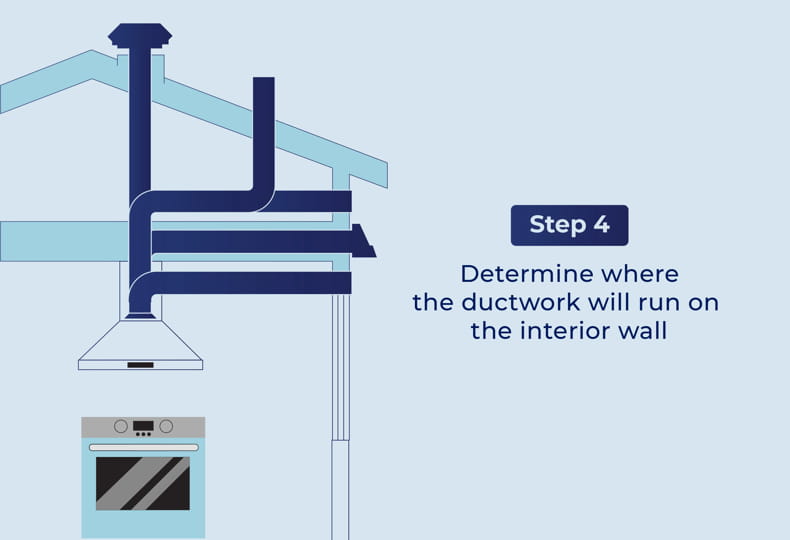
Planning The Ventilation Path
Planning the ventilation path is essential for a proper range hood setup. Start by evaluating the kitchen layout. Identify where the range hood will be placed. Consider the location of windows, doors, and other appliances. This helps in selecting the best duct route.
Next, determine the duct route. Measure distances between the range hood and the exit point. Shorter ducts are better for airflow. Ensure the route has minimal bends to avoid blockage. Use flexible ducts for easier installation in tight spaces.
Check local building codes for any restrictions. Proper ventilation improves air quality in your kitchen. A well-planned path makes installation simpler and more efficient.
Tools And Materials Needed
To vent a range hood, gather essential tools. You will need a drill, a screwdriver, and a level. A measuring tape ensures accurate measurements. Safety gear like goggles and gloves is important too.
Here is a materials checklist:
| Materials | Quantity |
|---|---|
| Vent duct | 1 |
| Wall cap | 1 |
| Screws | Pack |
| Sealant | 1 tube |
| Insulation (optional) | 1 roll |
Step-by-step Installation
Start by measuring the area where the range hood will be installed. Use a level to mark where the hood will sit. Carefully cut the drywall to create an opening for the ductwork. Ensure the cut is neat for a better fit.
Next, install the ductwork by connecting it to the range hood. Use metal duct tape to seal all joints. This prevents air leaks and maintains efficiency. Make sure the duct runs straight to the exterior.
Finally, secure the range hood in place. Use screws to fasten it to the wall. Check that it is level and stable. Turn on the hood to test its functionality.
Dealing With Obstacles
When installing a range hood, navigating studs and wiring is crucial. Use a stud finder to locate studs. Drill holes carefully to avoid damaging wires. Mark the spots for your vent. This helps in maintaining a safe installation.
Insulation plays a key role in efficiency. Make sure to use proper insulation around the vent. This prevents heat loss and keeps energy costs low. Pay attention to the local building codes for insulation standards. Proper insulation can also reduce noise during operation.
Finishing Touches
After installing your range hood, pay attention to sealing and caulking. Use high-quality caulk to fill gaps around the unit. This will prevent air leaks and improve efficiency. Choose a caulk that matches your kitchen decor.
Cosmetic fixes can make a big difference. Touch up paint where necessary to hide any marks. Add decorative trim around the hood for a polished look. These small changes enhance the overall appearance of your kitchen.
Ensure all screws and fixtures are secure. This adds to the stability of the installation. A well-finished range hood not only functions well but also looks great in your home.
Maintenance Tips
Regular cleaning of your range hood is essential for good performance. Clean the exterior with a mild detergent. Use a soft cloth to avoid scratches. Make sure to remove grease buildup from filters.
Replace filters every three to six months. Dirty filters can reduce airflow. Check the manufacturer’s instructions for specific guidelines. Use genuine filters for the best results. Always ensure the range hood is off before replacing filters.
Safety Precautions
Electrical safety is crucial when venting a range hood. Always turn off the power before starting any electrical work. Use insulated tools to avoid shocks. Check that all connections are secure and properly insulated.
Use a circuit tester to ensure there is no power. This will protect you from serious injuries. Do not overload circuits; this can cause fires. Follow the manufacturer’s instructions for installation.
Avoiding common mistakes is key. Never assume all wiring is up to code. Always double-check local electrical codes before starting. Use the right gauge wire for your range hood.
Make sure the range hood is grounded correctly. This prevents electrical issues and improves safety. Regularly inspect your installation for wear and tear.
Hiring A Professional
Hiring a professional for venting a range hood is important. Choose an expert when you face complex issues. If the installation involves electrical work or permits, call a pro.
Look for these qualities in a contractor:
- Valid license and insurance.
- Experience in kitchen ventilation.
- Good reviews and recommendations.
- Clear estimates and timelines.
- Strong communication skills.
Choosing the right contractor ensures a safe and efficient installation. This can save you time and money.
Legal And Code Considerations
Understanding building codes is essential for venting a range hood. These codes ensure safety and proper function. Local regulations can vary, so check your area’s requirements. Key factors include vent size, placement, and material.
Permits are often required for installation. Contact your local building department for details. Inspections may follow to ensure compliance with the codes. Failing to obtain permits can lead to fines or needing to redo work.
Be aware of any specific guidelines related to interior wall installations. Following these rules helps avoid future problems.
Credit: www.houzz.com

Credit: www.wikihow.com
Frequently Asked Questions
How Do I Vent A Range Hood Through An Interior Wall?
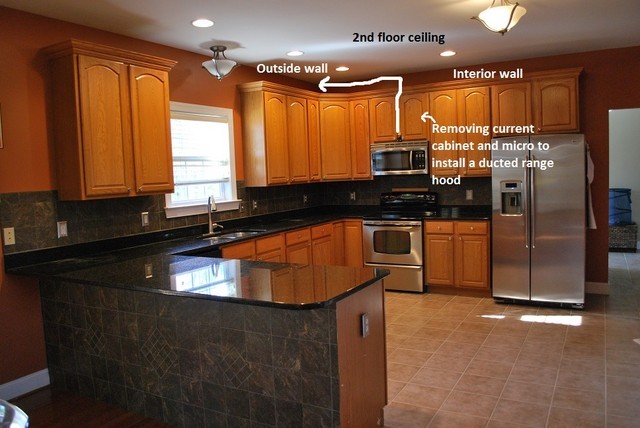
To vent a range hood through an interior wall, first determine the best location for your vent. Use a stud finder to avoid obstacles. Cut an appropriate-sized hole for the duct. Install the ductwork securely and connect it to the range hood.
Seal all joints for efficiency.
What Materials Do I Need For Venting A Range Hood?
You will need a range hood, ductwork, duct tape, and possibly a wall cap. Select materials that fit your space. Use insulated ducting for better temperature control. Ensure all components are compatible for optimal performance. Safety equipment like gloves and goggles is also recommended.
Can I Vent A Range Hood Without Outside Access?
Yes, you can vent without outside access using a recirculating range hood. This type of hood filters air and circulates it back into the kitchen. However, it may not be as effective as an exterior vent. Ensure you regularly replace filters for optimal performance.
What Is The Best Duct Size For A Range Hood?
The best duct size typically depends on your range hood’s CFM rating. Most range hoods require a 6-inch or 8-inch duct. A larger duct can improve airflow but may require more space. Always consult the manufacturer’s guidelines for the best results.
Conclusion
Venting a range hood on an interior wall can seem challenging, but it’s achievable with the right approach. Proper installation ensures better air quality and a more efficient kitchen. Take your time to follow the steps carefully. Enjoy the benefits of a well-vented space for cooking and entertaining.