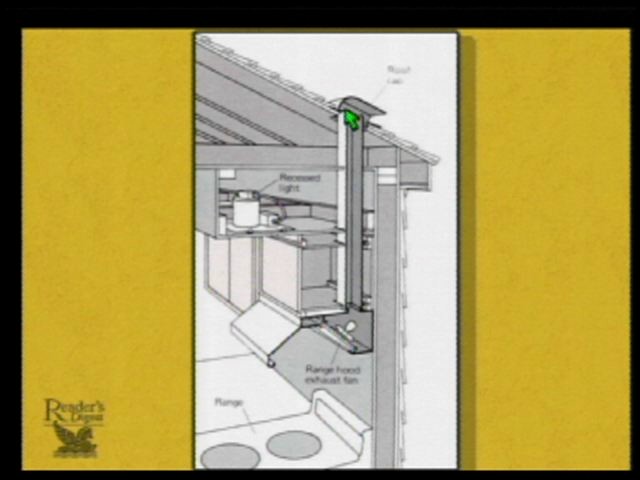
To install a roof vent for a range hood, first measure and mark the vent location. Then, cut the hole and secure the vent.
Installing a roof vent for a range hood is crucial for proper kitchen ventilation. It helps remove smoke, grease, and odors, ensuring a clean and healthy cooking environment. Proper installation also prevents moisture buildup, which can lead to mold and structural damage.
Before starting, gather all necessary tools and materials, such as a vent kit, drill, and caulk. Ensure the vent location is free of obstructions and offers a direct path to the roof. Follow safety guidelines, especially when working on the roof, to avoid accidents. Proper installation ensures efficient airflow and prolongs the lifespan of your range hood.
Credit: www.lambro.net
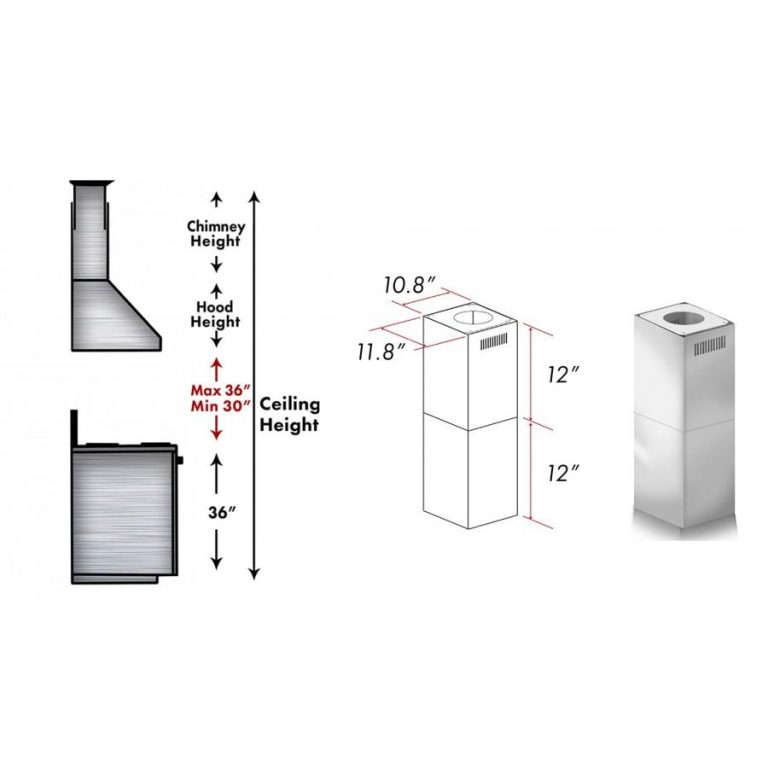
Choosing The Right Roof Vent
Selecting the ideal roof vent for a range hood ensures efficient kitchen ventilation. Proper installation prevents moisture buildup and improves air quality.
Types Of Roof Vents
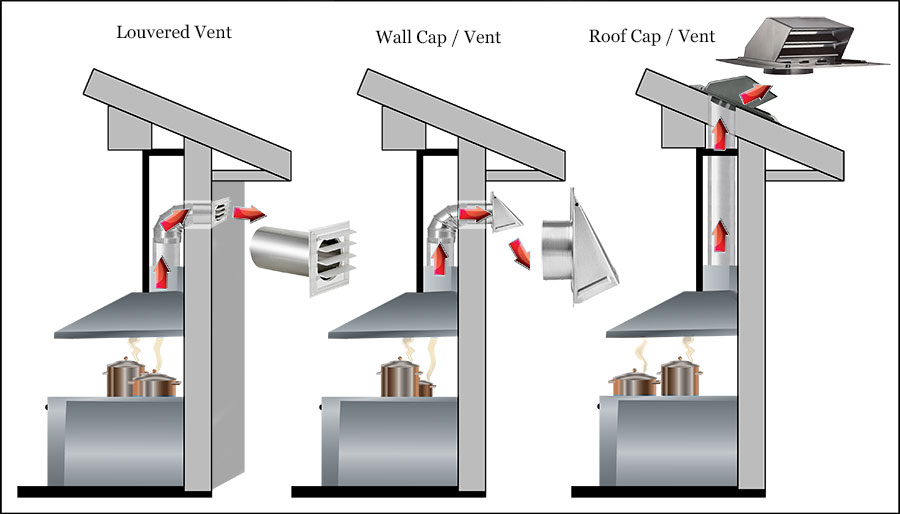
There are several types of roof vents available. Static vents have no moving parts. Power vents use electricity to operate. Ridge vents run along the roof’s peak. Turbine vents spin with the wind. Box vents are small and box-shaped.
Factors To Consider
Consider the climate in your area. Think about the size of your kitchen. Look at the material of your roof. Check the ventilation needs of your range hood. Ensure the vent matches your home’s design.

Credit: m.youtube.com
Tools And Materials Needed
A drill is necessary for making holes. Use a measuring tape for accurate measurements. A screwdriver is essential for tightening screws. Tin snips help cut metal. A utility knife is used for precise cuts. Safety goggles protect your eyes. Use a caulking gun to seal gaps. Work gloves protect your hands. Ensure you have a ladder for roof access. Pliers are useful for gripping small parts.
Get a roof vent suitable for your range hood. Duct tape helps secure ducts. Roofing nails are needed for attaching the vent. Sealant ensures a waterproof seal. Metal flashing prevents water leaks. Ducting connects the hood to the vent. Screws are required for assembly. Insulation prevents heat loss. Wire mesh keeps out pests. Rubber washers help seal screws.
Preparing For Installation
Always wear safety goggles and gloves. Make sure to turn off the power before starting. Keep a first aid kit nearby. Make sure the ladder is stable and secure. Never work alone on the roof. Check the weather for rain or strong winds. Use non-slip shoes for better grip. Keep all tools within easy reach. Avoid loose clothing that can get caught.
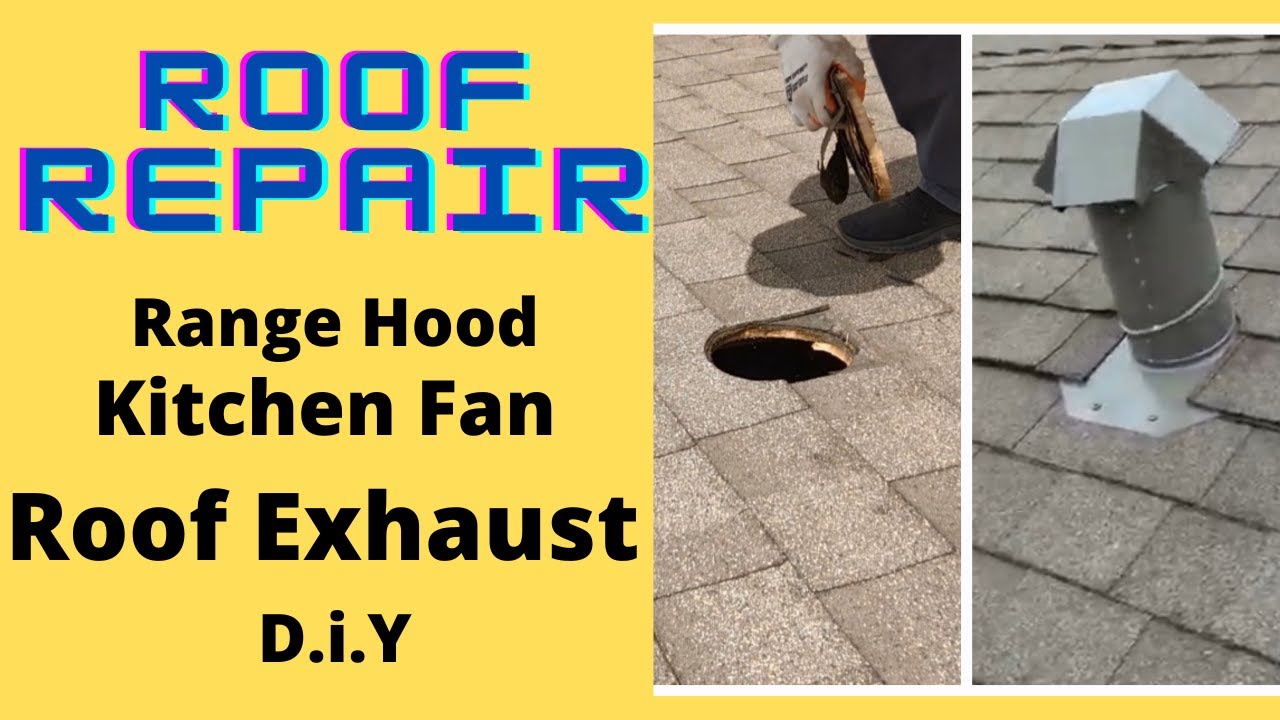
Use a measuring tape to find the center of the vent. Mark the spot with a pencil. Ensure the spot is directly above the range hood. Measure twice to confirm accuracy. Use a level to check the straightness. Draw the outline of the vent on the roof. Double-check all measurements before cutting. Make sure there are no obstructions in the path. Clear away any debris from the marked area.
Step-by-step Installation Guide
Mark the spot for the hole. Use a pencil for the mark. Drill a small pilot hole first. This helps guide the saw. Use a reciprocating saw to cut the hole. Cut slowly and carefully. Make sure the hole is the right size. Clean up any debris around the hole.
Place the vent hood over the hole. Ensure it fits well. Use screws to secure the vent hood. Seal the edges with silicone caulk. This prevents leaks. Attach the duct to the vent hood. Secure it with duct tape. Check for any gaps or leaks. Make sure everything is tight and secure.
Sealing And Insulating The Vent
Properly sealing and insulating the vent ensures efficiency and energy savings when installing a roof vent for your range hood. Secure the vent to prevent leaks and enhance overall performance.
Applying Sealant
Clean the area around the vent opening. Apply a generous amount of sealant to the edges. Use a caulking gun for better control. Smooth the sealant with a putty knife. Ensure there are no gaps or air leaks. Let the sealant dry for the recommended time.
Adding Insulation
Choose the right insulation for your vent. Cut the insulation to fit around the vent pipe. Wrap the insulation snugly around the pipe. Secure it with tape or straps. Check for any exposed areas. Cover any gaps to prevent heat loss.
Testing The Vent System
Inspect the vent for any visible damage. Turn on the range hood. Feel for air escaping around the vent. Seal any leaks with caulk or tape. Double-check all connections to ensure they are secure. A leak-free system ensures proper ventilation.
Ensure the vent system moves air efficiently. Turn on the range hood. Hold a piece of paper near the vent. The paper should stick to the vent. Clean the filters if airflow is weak. Check that the ducts are not blocked. Proper airflow is crucial for a functioning vent system.
Benefits Of A Roof Vent For Range Hood
A roof vent helps to remove smoke and odors from your kitchen. This vent ensures that the air stays fresh and clean. Cooking can create a lot of steam and grease. A roof vent helps to get rid of these quickly. This keeps your kitchen air healthy and pleasant.
Using a roof vent can make your home more energy-efficient. It helps to keep your kitchen at a comfortable temperature. You won’t need to use your air conditioner as much. This can save you money on your energy bills. A roof vent is a smart choice for any home.
Maintenance Tips
Inspect the roof vent every three months. Look for any blockages or debris. Ensure the vent is not damaged or bent. Check the vent connections to the hood. Make sure they are tight and secure.
Clean the vent every six months. Remove any dust and grease buildup. Use a mild detergent and a soft brush. Avoid using harsh chemicals. Rinse with water and let it dry completely. This keeps the vent efficient and safe.

Credit: diy.stackexchange.com
Conclusion
Installing a roof vent for your range hood can greatly improve kitchen ventilation. It ensures proper airflow and reduces odors. Follow the steps carefully and consult a professional if needed. A well-ventilated kitchen promotes a healthier cooking environment. Enjoy the benefits of a fresh and odor-free kitchen space.