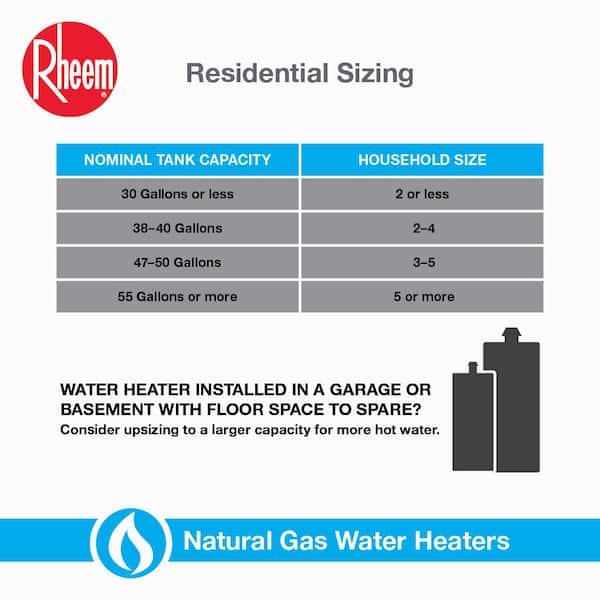
A 220V hot water heater wiring diagram shows the correct way to connect electrical wires to the heater. It ensures proper and safe installation.
Hot water heaters are essential for providing a consistent supply of hot water in homes and businesses. To install a 220V hot water heater, understanding the wiring diagram is crucial. The diagram typically includes connections for the power supply, thermostat, and heating elements.
Correct wiring prevents electrical hazards and ensures the heater operates efficiently. Always turn off the power before starting any electrical work and follow the manufacturer’s instructions. Consulting a licensed electrician is advisable for those unfamiliar with electrical systems. Proper installation guarantees safety and extends the lifespan of your water heater.
Tools And Materials
Proper tools and materials ensure accurate 220V hot water heater wiring. Essential items include wire strippers, screwdrivers, and electrical tape.
Required Tools
You need a screwdriver and a voltage tester. A wire stripper is also important. Pliers will help you grip and twist wires. A wrench is needed for tightening connections. Having a multimeter is very helpful. Make sure you have safety gloves and goggles. A drill might be useful too.
Necessary Materials
Get the right gauge wires for your heater. Ensure you have wire nuts and electrical tape. You will need a breaker suitable for 220V. A junction box is required. Get mounting screws and anchors. Do not forget the heater’s user manual. Labels for wires can be very helpful.
Understanding 220v Systems
A clear 220V hot water heater wiring diagram simplifies installation and ensures safety. Proper wiring connects the heater to the power supply, enhancing efficiency.
Voltage Basics
Voltage is the force that moves electricity. A 220V system has more force than a 110V system. This means it can power bigger appliances. Hot water heaters often need 220V. This is because they use a lot of energy.
Differences From 110v
A 220V system uses two hot wires. Each wire carries 110V. Together, they make 220V. A 110V system uses one hot wire and one neutral wire. This is less powerful. Most homes have both 110V and 220V circuits. The 220V is for big appliances like hot water heaters. Small appliances use 110V.
Preparation Steps
First, locate your home’s main electrical panel. Find the circuit breaker labeled for the water heater. Switch it off to cut the power. Double-check using a voltage tester. Ensure no electricity flows to the heater. This step is vital for safety.
Collect essential supplies for the wiring task. You need a voltage tester, wire strippers, and electrical tape. Also, have wire nuts, screwdrivers, and a wiring diagram on hand. Make sure you have the correct gauge wire. These tools make the job easier and safer.

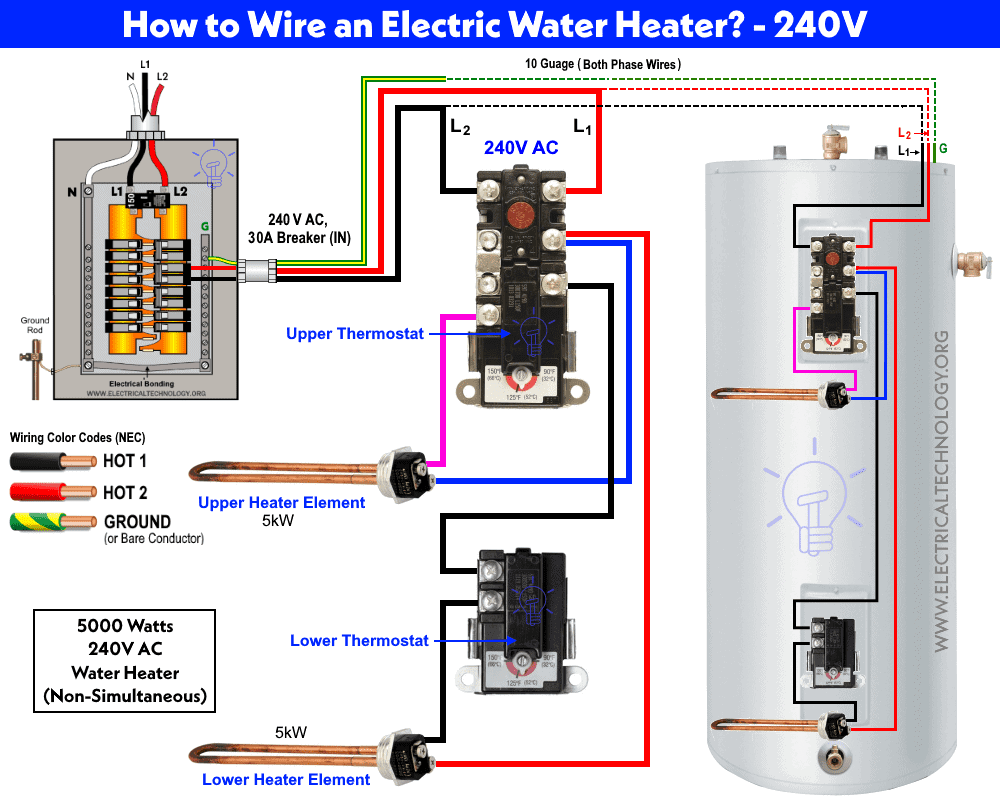
Credit: www.electricaltechnology.org
Wiring The Heater
First, turn off the power at the circuit breaker. Next, remove the heater’s cover to access the wiring. Identify the live wire, the neutral wire, and the ground wire. Connect the live wire to the L terminal on the heater. Attach the neutral wire to the N terminal. Finally, secure the ground wire to the grounding screw. Ensure each wire is firmly connected.
Use wire nuts to secure the connections. Twist the wires together before placing the nut. Make sure the wires are firmly twisted and the nut is tight. After securing, tug each wire gently to ensure it does not come loose. Cover the heater’s wiring section with the cover plate. Finally, turn the power back on at the circuit breaker.
Installing The Heater
Find a strong wall to mount the heater. Use a level to ensure it is straight. Mark the spots for the screws. Drill holes at the marked spots. Insert wall anchors if needed. Attach the mounting bracket to the wall. Hang the heater on the bracket. Make sure it is secure.
Turn off the main water supply. Connect the cold water line to the inlet valve. Tighten the connection securely. Connect the hot water line to the outlet valve. Use plumber’s tape to prevent leaks. Turn on the water supply to check for leaks. Tighten any loose connections if needed.

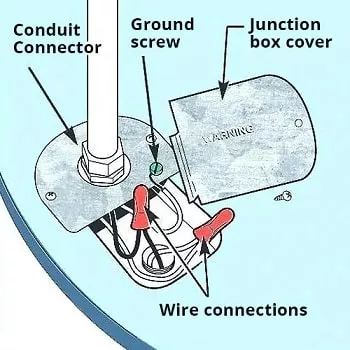
Credit: www.pinterest.com
Testing The Installation
Confirm proper connections using a multimeter for testing the installation of your 220V hot water heater wiring diagram. Ensure all wires are securely attached and check for any potential faults.
Checking Connections
Make sure all connections are tight and secure. Inspect the wiring for any frayed or damaged areas. Double-check that wires are attached to the correct terminals. Use a screwdriver to tighten any loose screws. Ensure the ground wire is properly connected. Safety is important, so wear gloves if needed.
Powering On
Turn on the power at the breaker box. Listen for any unusual sounds from the heater. Feel the water pipes to ensure they are warming up. Check the thermostat setting on the heater. Wait a few minutes and test the water temperature. If the water is heating, everything is working well.
Troubleshooting
Understanding a 220V hot water heater wiring diagram can help identify and fix common electrical issues. Ensure correct connections to maintain safety and efficiency.
Common Issues
Hot water heaters can have issues. Common problems include the heater not turning on, no hot water, and strange noises. Check the circuit breaker first. It might be tripped. Next, inspect the thermostat. It could be faulty. Also, look for any loose connections. These can cause problems.
Quick Fixes
Reset the circuit breaker if it is tripped. Tighten any loose wires to ensure good connections. Replace the thermostat if it is not working. Sometimes, the heating element needs replacement. Always turn off the power before working on the heater. Safety is very important.
Maintenance Tips
Check your hot water heater every month. Look for any leaks or rust. Make sure the wiring is not damaged. Inspect the thermostat and heating elements. This helps to catch problems early.
Turn off the power before cleaning. Drain the tank to remove sediment. Use a hose to flush out the tank. Clean the exterior with a damp cloth. Make sure the vents are clear. This helps the heater run efficiently.
Credit: www.plumbersstock.com
Frequently Asked Questions
How Do You Wire A 220v Hot Water Heater?
To wire a 220V hot water heater, connect the red and black wires to the circuit breaker. The green or bare wire should be connected to the ground.
What Size Breaker For A 220v Water Heater?
A 220V water heater typically requires a double-pole 30-amp breaker. Ensure your wiring is compatible with this amperage.
Do I Need A Permit For Water Heater Installation?
Yes, most local codes require a permit for installing a water heater. Check with your local building department.
Can I Install A 220v Water Heater Myself?
If you have electrical experience, you can install it yourself. However, hiring a licensed electrician is safer and recommended.
Conclusion
Understanding the 220V hot water heater wiring diagram ensures safe and efficient installation. Always follow the manufacturer’s guidelines and local codes. Proper wiring enhances performance and extends the unit’s lifespan. For any uncertainties, consult a professional electrician. This guide aims to make your installation process smoother and safer.